Okay, so when I left you last, we were making a big mess changing a mother-in-law suite over to a playroom. If you haven’t had a chance to read how I avoided being crushed to death by a large cabinet, you can certainly check it out here: Project Playroom: Part 1. For now, the craft room section of the playroom is at a standstill. I need to find a table top for my craft table, and as I am leaning towards a high-gloss white laminate counter, it is proving more difficult than one would have thought. The small debate over whether to make one (cheaper, but higher level of frustration) or whether to just order a pre-made counter top (easier, but more expensive) has slowed my progress on that side of the room.
No matter. I can still keep myself busy!
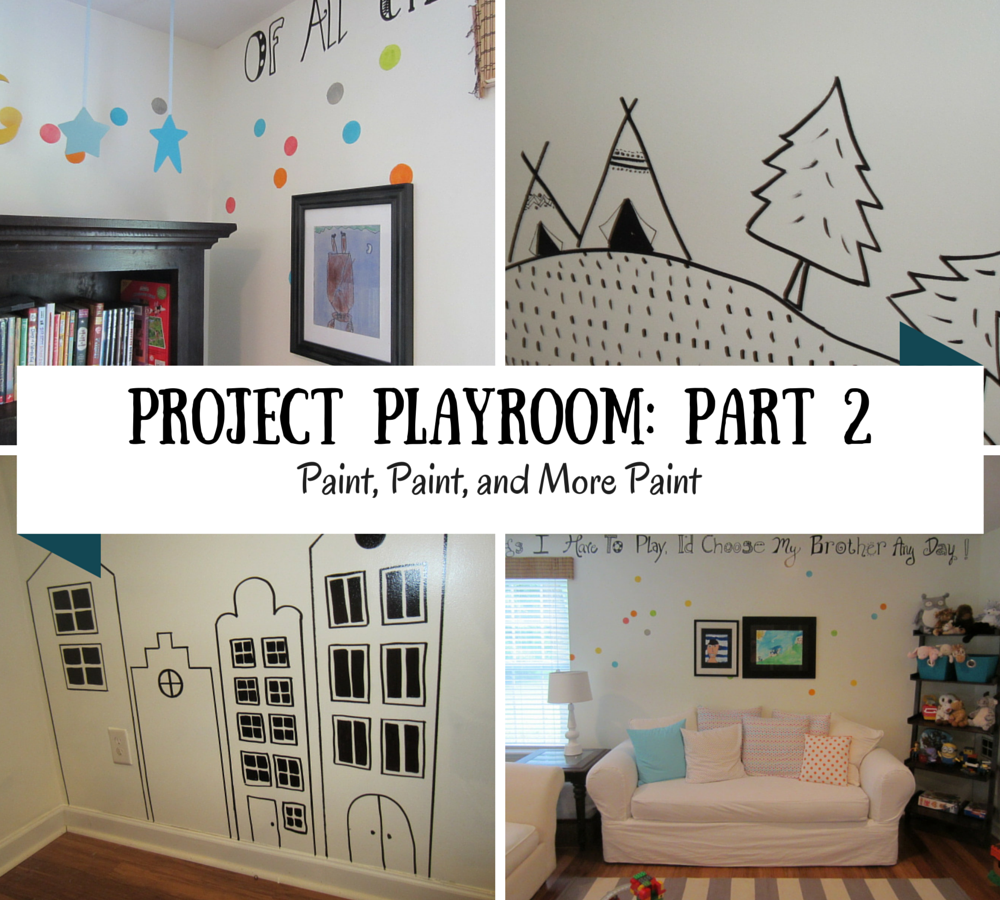
Paint is one of the easiest and cheapest ways to change the look of a room. Now I, personally, have a love-hate relationship with paint. As much as I despise (loathe, dread) the actual process, I do it all of the time. Because I love, love, love how dramatically a good paint color can change a room. Painting a room provides immediate gratification…and who doesn’t love that every once in awhile?
I knew from years of pinning playrooms, nurseries, and other spaces dedicated to little ones (beautiful inspirations can be found here on my board) that I wanted a white playroom, with black accents, and pops of color here and there.
Here is our playroom, in its move-in original color, boring beige.


And it stayed boring beige for almost a year. Then I got that painter’s itch. You know, the one that starts off a little annoying and then goes to full-blown-I-can’t-take-it-anymore. That’s when I know I’m ready to make a change. I need a strong enough push to counteract the paint-loathing-hold that usually has me.
I decided to start small…but dramatic. I knew I wanted an accent wall to portray the kiddos’ art. I wanted to give the look of a chalkboard wall without actually using (or allowing…God forbid) yucky, messy, dusty chalk. If you’ve put a chalkboard wall in your house before, you know exactly what I am talking about. It looks ugly, swipey, smeary more than it looks pretty; especially if children are involved. You can check out my dark wall inspirations and . I decided the corner wall around the playroom entrance would be perfect.
I began the dreaded process of taping off. So boring…I hate taping.
Going Black


When I got to this next wall, I honestly wasn’t sure if I wanted to paint it or not. I worried (a little) it might get too dark. But I also worried the one little corner I had just taped off might not be enough. I decided to play it by ear. I’d paint the corner first. Then I would decide whether or not I wanted the color to continue along the back wall.

Now it was time to pick a paint color. I settled on Valspar’s Semi-Sweet. I chose a flat finish because I didn’t want the dark walls to shine at all.
And here we go…

I have to tell you…I liked it right away. It was the perfect shade. Dark, velvety charcoal. Of course, at one point, Hubby came downstairs and cringed, “You’re painting the playroom black!?”
This is where I would insert my , had I had rights to it. Hubby hath little faith sometimes.
As you can see, “To Paint” won out, and I finished out the back wall. It looks good, right?

Going White
Okay, now for the rest of the room. Ugh, even with my desire for change, I really wasn’t looking forward to it. So much taping. Instead of following around the room like a normal person, I went right for the main wall. Reason 1) It would provide me an instant visual of new wall color when walking in room. Reason 2) One window–very little taping involved.
I settled on Valspar’s Betsy’s Linen simply because I had used it before (see Office Before & After), I liked it, and we still had over half a gallon left.


Now, despite being a paint and primer, it took at least three coats to get that solid white look I was going for. One would not think beige was dark, but when you’re going white, be prepared to paint. And then paint some more.


Finally getting somewhere…

Painting Polka Dot Confetti
Now that the walls were sufficiently white, it was time to have some fun. I had several ideas for this room that included: confetti on the walls, a stenciled quote, and some black-outlined murals here and there. There was no real theme, just that I wanted it fun and whimsical!
Let’s start with the confetti. I had seen it and and thought it was SO cute! I had already recovered several pillows for the playroom couch (there is a bright red floral couch underneath the white slipcover, by the way) and thought some confetti on the walls would compliment nicely.


Originally, I was going to buy the wall decals on Etsy. But then time got away from me and I didn’t order any, and now, not wanting to wait (I am so impatient when it comes to my projects) I decided to do it myself.
I picked up some fun paint colors at Michaels, as well as a circle stencil plate. Much cheaper!


I started off using a sponge when doing this, which I will say did not work very well. My circles were not coming out very defined. The paint was leaking and leaving wonky circles needing touch-ups. Annoying.
When I switched over to an angled brush, my circles came out much more defined. No more smudges or leaking under the stencil. I was actually able to paint multiple colors very quickly as long as I wiped down my stencil plate each time.


Hand-Stenciling A Wall Quote
As you can see above, while working on my polka dots, I was also working on adding a hand-stenciled quote: Of All the Things I Have To Play, I’d Choose My Brother Any Day! I knew I wanted this stencil to be funky and different for each word, so I played around on the computer with various fonts until I found a mixture that I liked. You will probably recognize a few fonts!

I have stenciled before, and I know one of the biggest issues I have is spacing. It is SO difficult sometimes, and unfortunately, I am very particular! If it doesn’t look right, i.e. centered, I will not like it. To help myself out (I thought), I printed each word individually on separate sheets of copy paper. I tried to make the words about the size I would be using on the wall, but sometimes I had to reduce the font size to get the word to fit on the paper.
Once I had every word printed, I wanted to find out exactly where the middle was. The best way to do this, I have found, is to type the sentence (make sure it is center aligned) on the computer in regular font, print it out on paper, and fold the paper in half. That process will give you the most accurate center. My quote just happened to divide nicely at the comma, but that doesn’t always happen. Sometimes it will divide in the middle of the word.
Once you determine the middle of your sentence, you need to determine the middle of the wall you are stenciling. That is actually where you want to begin. Since I had printed each word individually, I taped up the middle (two words) first, and then worked from the inside out.


I used my laser level to get a nice even line across the wall and got ready. This is the paint pen I purchased. I chose an oil-based pen, but they had water-based pens as well.

I placed a piece of painters tape along the ceiling each time I did a letter to give myself a “top” stopping point. Then I slowly began to hand-stencil each letter. I kept my sample with me as I went along, and tried to replicate each letter as best as possible.


Each time I started a new word, I removed the next paper. Again, all of this was supposed to help me with spacing.

Things were moving along nicely until I passed the middle of the wall. And that is when I realized that as hard as I tried to get all of my spacing right, my handwriting was larger than most of the pre-printed words, and I was going to run out of room.
Insert: Foot stomping and profanity.
I had to quit for the day. I was so very frustrated. All of my precautionary steps, and I still failed to get it right. Ughhhhhhh.
A few days later, I came back, painted over all that I had worked on (sigh) and began again. If you look at the word “Things” in the before picture, and then again in this next picture, you can see how far the words ended up being moved back. Oh well. Live and learn.


In the end, it worked out perfectly!
Right around this time is when things took an interesting turn. My in-laws sold their house in Florida and moved up to South Carolina (and into our playroom) while they began house-hunting. Thus our mother-in-law-suite-turned-playroom, once again, became an in-law suite, and progress was temporarily halted. No matter…we were absolutely ecstatic to have family close by!!!
Adding Whimsy to the Walls
About a month later, we were back in business! I finished out the confetti, added some of the boys’ art, and began thinking about my future murals.


I had lots of ideas in mind, a collection of odds and ends from various playrooms and kid rooms that I had seen over the years. I made a list of what I envisioned on our playroom walls: hot air balloons, houses, fox, hedgehog, tee pees, moon, stars, bunny, arrows, bumblebee, mushrooms, and sheep. There is no rhyme or reason to this list other than this is what I wanted to draw. I figured it didn’t mean to make any sense. It just had to be whimsical!
Black on White

I began in the far-right corner and started with houses. My inspiration came from this . You can check out the actual blog here.

Sorry this is blurry…


I used a straight-edge for the sides of the building only. The rest–windows and doors–are completely free-handed.
Next, I added the hot-air balloons. This inspiration came from an I saw on Etsy. You can actually purchase it here.


I decided to do the tee pees next. Here are a few of my inspirations: first the , and then the wall mural on this Vert Poussin Blog. I think it is absolutely precious. I free-handed my own version here.


And remember how I had sheep on my list? That inspiration came from . I added them right along the same hills!


Right around this time, I came across the . A panda wasn’t on my original list, but that wallpaper was so cute, I soon added him.

Zoom in on bumblebee.

I also added a little ladder heading up to the moon.

White on Black

As I reached the dark accent wall, I decided to carry over the mural, but this time drawing white on black. Here are the mushrooms I wanted.


And a little hedgehog! His inspiration comes from this art print.

A few dandelions.

I’m hoping to add my fox on this wall, but I’ve painted and then painted over two so far. When I get it right, I’ll show, I promise.

And finally, some waves… Also not on the original list, but fun to draw!

Plus…and I cannot wait to finish and show you….the waves are a nice lead into Project Playroom: Part 3 | The Playroom Bathroom!!!! It’s almost done, and I am so stinkin’ excited to show you what I have been up to.
For now, I’ll leave you with one more view of our playroom in progress. It’s coming along…slowly but surely.

Kelly


 The Miter Saw Queen
Love the clip art! Very very creative! ?❤️?