Anybody watching the news a few weeks back knows my beautiful city of Charleston basically shut down for a few days while we all dealt with the onslaught of Hurricane Joaquin’s rains (four solid days of it), high tides, and flash floods. Schools and businesses closed, roads closed, and then, the entire peninsula shut down.
For five days, we were asked to stay in our homes and off the roads.
I went a little stir crazy, people. I’m not going to lie.
Luckily for my family, however, stir crazy was the extent of my problems. Our home was safe, my children were happy (What!? No school again!? Yippee!), my neighborhood didn’t flood, and we never lost power. This was important because it meant I could catch up on blog posts and browse Pinterest for unlimited amounts of time. But I can only browse Pinterest for so long before I get that project-itch. I don’t want to be reading about projects. I want to be doing them!!!
So I did what any crafter does during a flood; I dragged all of my Fall decorations down from the attic and got busy!
I decided to go pink this Autumn, which you can read more about in my post Fall in Blush, but I also wanted to incorporate a woodsy-rustic feel to my decor. For some reason, walking in the woods is something I associate with Fall.
Which is weird. Because walking in the woods is not something I do (snakes and serial killers seem to trump the whole-Anne-of-Green-Gables-woods-walking-nostalgia.)
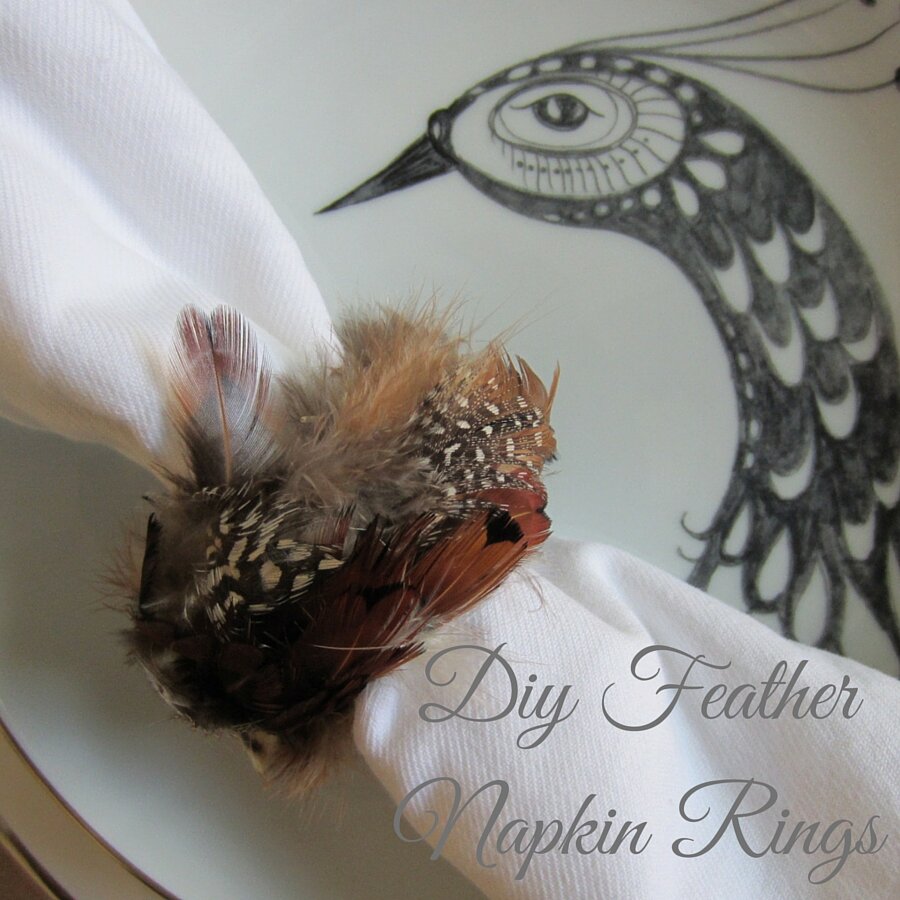
But regardless, I wanted dried leaves and acorns and twigs and bird nests…and then, this idea came to me that I wanted Feather Napkin Rings. Feathers are a pretty popular craft-resource, so I immediately started googling crafty little feather projects, thinking somebody has surely already done this, and I can read about it and follow their lead….
Only I didn’t find anything.
Which I have to say, surprised me. Because it seemed like such a good idea. Easy too! Suddenly, I was like the Little Red Hen. Then I’ll do it myself.
And I did.

And I loved them!

Want To Make Your Own?
Here’s what you’ll need:
- A set of napkin rings
- A bag of feathers
- Glue

Napkin Rings
I shopped around for a few days online (Amazon, Etsy, Ebay) for napkin rings. I really did not want to spend a lot of money, so I was looking for a set of pre-used. I found the set I ended up using on Ebay. They were less than $7 for the six napkin rings and that price included shipping. Hip! Hip! Hooray! They were the shape I was looking for–sort of round, almost sphere-like–I figured this would work well with feathers. And they were already wood, so I could eliminate having to spray paint them first. *If you find a set, but the color doesn’t work for you, just spray paint them brown, tan, or gray before you start to give it a more natural base color.
Feathers
I bought both bags of feathers ( and ) online at Amazon. You don’t really need two bags. I simply bought them both to give me a variety in color. I loved the Guinea fowl spotted feathers, but I wanted some browns and grays to play around with as well, which is why I went with both bags. I’m really glad I did. First off, you really need smaller feathers for this project, and a lot of the Guinea fowl feathers were too big; I only used the smallest in the bag (but they really are so pretty and fluffy, they add a nice dimension). The majority of my napkin rings sport feathers from the Nature Mix. These feathers were the perfect size, they had a good curve to them which lent itself nicely to this project, and they were really, really pretty! I have to say, I really started appreciating bird beauty during this project. Feathers are gorgeous.

Glue
I chose to use a Fast Grab Tacky Glue. Now there are some pros and cons to using this glue. The con is that it is a pain-in-the-#$@ to get out of the bottle. You want to set it upside down before you begin to give it time to oh….so….slowly….drip…..down. The tip fits nicely in the round of a spool of thread, so I usually use that to hold it upside down while working. You can leave the cap off while upside down; it won’t leak. The pro to using this, and the reason I chose it, is because it does immediately grab what you are wanting to glue and it doesn’t drip all over the place (hence the oh-so-slow-wait-in-the-beginning). I’m sure you could use a hot glue gun if you wanted to work a little quicker, but I didn’t want to deal with the glue string that tends to occur, especially with feathers; plus this is definitely a project in which your fingers could easily get burned. Better to stick with a non-heated glue.
Let’s Get Started
- Add a section of glue to your napkin ring.

2. Glue down your first set of feathers (about 2-3 depending on the size) by adding the quill of the feather to the top of your glue section. I liked to start with really fluffy, downy feathers first; then I alternated with more traditional, slick feathers.

3. You sort of work backwards. So your next set of feathers will go on top of and slightly behind your first set. Try to glue down the quill only.

Here’s a view from the side. There are two rows on this napkin ring.

4. Continue this process of adding glue (behind your already glued-down feathers) and adding more feathers. Choose feathers that follow the natural curve of the napkin, but don’t be afraid to let a few stray this way or that. It gives it a charming, unique look.

5. Eventually, you’ll come back around to the first layer you glued down. This is where is gets a little tricky. You need to add glue under your first layer (without letting the feathers stick to it) and gently tuck in your last layer.


6. When you’ve finished adding feathers around the outside of the napkin ring, you may still need to add a few to either side to cover any part of the original napkin ring still showing. I chose really small feathers for the sides.


7. Now, I wanted my napkin rings sort of wispy and whimsical, so I added a few larger, fluffy feathers here and there at the very end. To add feathers individually,you need to put some glue on the tip of the quill and then insert the feather where you’d like it.


Overall, I was really pleased with how these turned out!

They are so unique and really, very pretty!

They look just beautiful on my Fall Tablescape!


I hope this inspired you to make something crafty! Let me know what you think!

2 thoughts on “DIY Feather Napkin Rings”