
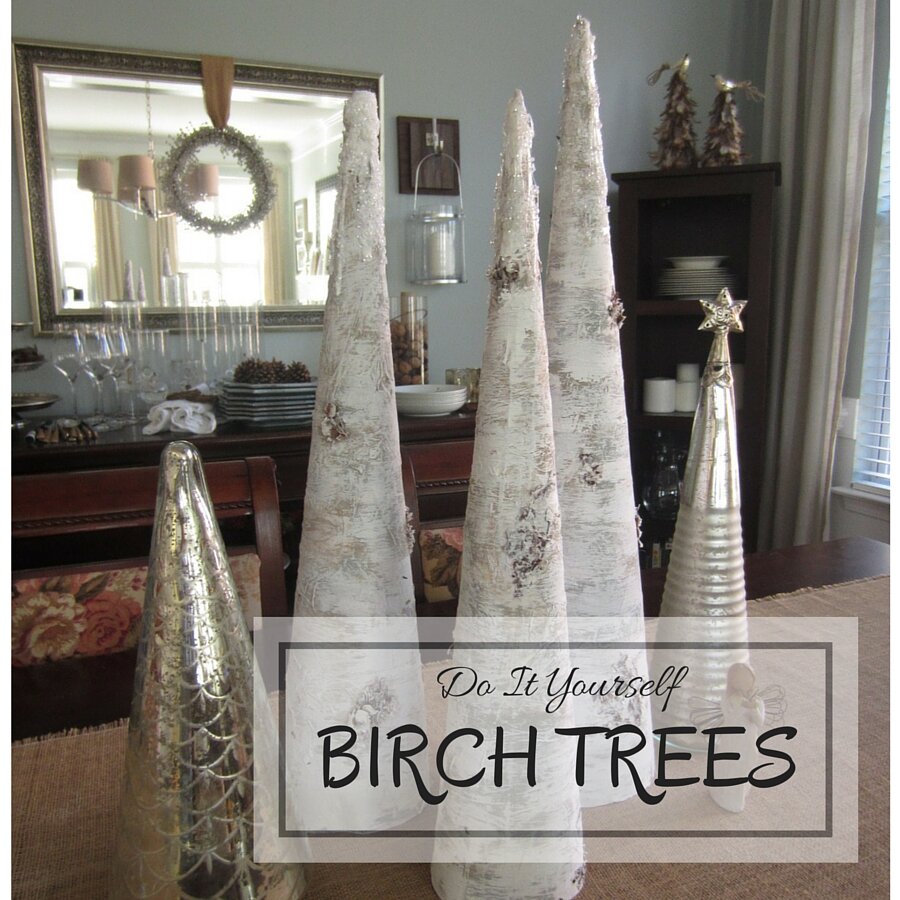
So, I was walking through Home Goods this past November, checking out all of their wonderful Christmas decorations, and I came across a set of two gorgeous Birch Cone Christmas Trees that I instantly fell in love with.
The only problem…
They were $40 each. Yuck. Did I really want to spend eighty dollars on cone trees? No, I did not. But I did really, really like them. So I did this sort-of creepy stalker-shopper thing. You know what I’m talking about? Where you reach out to put an item in your cart, and then you pull your arm away because your conscience is already reprimanding you. And then, just in case anyone happens to be looking, you browse over all the other things nearby on the shelf, but really, all you are doing is thinking about the one thing you aren’t looking at. So you put it in your cart. And then you take it out again. Because, damn it, $80 can go a lot further than two trees! Then you make yourself move on, but just as you round the corner, you sort of look back and stare at it again. See? Creepy stalker.
I circled back to that aisle three times, my friends.
On that third round, a little thought popped into my head. Why don’t you make these, Kelly? (Now, you’d think, as much as I craft, that these little thoughts would come sooner than they do; that I could avoid the whole creepy shopping episode all together. But nope. I get to look weird before I look creative. I like to think I’m providing humor to someone up above.)
Anyway, I went back and stalked…er..studied the Home Good’s birch trees pretty closely. Yes, I decided. I could make them.
Shopping for Supplies
More than likely, if you are a crafter like me, you’ll have a lot of this stuff in your home already. But if not, here’s what you will need to shop for:
- Poster board paper–I bought a pkg of 6 at Walmart
- White tissue paper
- Liquid glue* more details below
- Hot glue gun
- Dried leaves, pine cones, twigs, and/or bark
- White, gray, and tan paint
- White/clear glitter
- Glass Vase Filler (found this at Michaels)
- Plastic grocery bags (use these as stuffing for your larger cones so they keep a firm shape)
Making the Cone Tree
I went online and looked at a lot of DIY Cone Tree tutorials, and found a few patterns, but in the end, I simply rolled my poster board. I kept the corner I wanted to roll closest to me, and then just started twisting the poster board (for taller cone trees, you’ll need to roll from the side of the poster board).

I tried to keep the top of my cone as pointy as possible, but as I knew I would be adding glitter and vase filler later, I wasn’t too worried if it had a slight hole at the top.

Just keep rolling…just keep rolling…just keep rolling, rolling, rolling. What do we do? We roll! (I find myself singing like Dory from Finding Nemo a lot…the verb simply changes).

When I got almost to the end, I used my hot glue gun to hold the shape.

You simply add a line of glue and roll. Then add another line of glue and roll. I repeated this until the cone was finished.
By the way, it was extremely difficult holding the cone steady while also holding the camera; hence my Hobbit hand. Ewww.

Time to measure and cut off the bottom so it is level. I used my sewing measuring tape to mark off a height I wanted.
And due to ugly-Hobbit hand above, I recruited Version 1.0 to help me take a few pictures. However, being only eleven years old, he has not the patience to hold the camera steady for Mom’s boring photos, so these next few are a bit blurry.


I circled around the entire base of the cone and marked it. Then I cut off the excess.

You may have to tweak it a few times before the bottom is good and level, but it is important, or your tree will look all wonky standing next to the others. If the top of your cone has a large hole, now’s the time to tape it over with some masking tape.
Also, it is a really good idea to add stuffing to the inside of your cone. I used plastic grocery bags. I found this really helped the cones keep their shape, especially the larger ones. I stuffed them full of grocery bags, and then taped off the bottom with masking tape.

Adding Texture
This part is very simple, yet somewhat messy. I suggest using some kind of plastic tarp so you can be as sloppy as needed without damaging any surfaces or counter tops. You can see my tarp below has been used for many projects–it comes out frequently!!
You’ll need the following items for this part: white tissue paper and a liquid glue mixture*.
Now I used a matte varnish, but ONLY because I happened to have it on hand. I have done similar projects like this before, and you can get the same results from using a mixture of 2 parts Elmer’s glue and 1 part water–so don’t be afraid to go cheap if you don’t have this or something like it laying around your house!

Take a stack of your tissue paper and cut it into strips.


I used two or three strips at a time, and laid them out flat. Then I brushed the glue mixture over the strips until they were pretty wet.

Take the strips and wrap around the top of your cone. It’s going to be messy and wrinkled and sometimes they even rip. That is okay! It’s going to give your cone a realistic look when all is said and done.
Use your paintbrush and add a little more glue mixture to smooth down the strips as needed.

There were two different techniques I used with the tissue paper. One was to fold over the top, as shown below. This gives your birch nice tree rings as you work your way down the cone.

The second technique is to pull and stretch your strips so they wrinkle up. Then layer around the cone. This also gives a nice realistic look to your tree.

Continue to alternate these techniques as you make your way around and down the cone.

Be sure to take your paintbrush and glue mixture and smooth out the strips as you add them (you can also use your fingers to do this…they’ll just get very messy and sticky towards the end).


Here’s what your cone tree will look like at the end.

This whole process takes about 10 minutes per tree. You do need to allow these sufficient time to dry before you move on the next steps. I stuck all of mine on the floor vents and let them dry overnight.
Painting
Once your tissue paper has dried, it’s time to add paint. You will need your gray and tan paint first.
I already had both of these colors from previous projects, so that’s what I used.

All you need is one paintbrush–it’s that simple.

Start at the bottom and just swipe the paint on using back-and-forth brush strokes. I did this until the brush started to dry out (this gives it that natural tree-bark look anyway) and then I added the next color.


I repeated this process of adding gray, then tan, all the way around the cone to the top.


Give it about 10-15 minutes to dry and then you can start to add your tree knots and bark texture.
Adding knots and bark
I used a mixture of broken up pine cones, twigs, and crushed dry leaves for this. I had previously taken apart an old grapevine wreath to make my new Christmas wreath, and the timing could not have been more perfect, as it made a holy mess, and all of that natural bark and leaf matter was swept into a little pile and used for these cone trees. Now, I’m assuming you haven’t necessarily been wreaking havoc on a wreath, but no fear, you can still acquire said supplies by heading out in your own back yard and picking up some dried leaves and sticks and twigs.
Or if you’re worried about little critters, you can just open that store-bought bag of pine cones, and break down a few into bits and pieces.
Funny little side note: I had a somewhat serious conversation with Hubs about whether or not our food processor could possibly break down a pine cone into tiny bits and pieces. I was seriously asking, and Chef Hubby was seriously disturbed that the conversation was even occurring. And somewhat concerned I would try it.
I did not.
…But I do think it would work. Just saying.

Use your hot glue gun to add a sort-of misshapen circle or oval (I swiped my glue gun back and forth to get this shape).

Then add your dry leaf/twig matter. Press down a little to make sure it is all sticking in the glue (because you will be painting over it later and don’t want it to come off).

Continue to add little knots and bark texture here and there around the cone. Vary their shapes and sizes.


Here’s a look at the how I spaced mine out (the two in the back are finished products).

Final Coat of Paint
Now it’s time to add your final coat. This time you will use your white paint. Again, you are going to use the same dry swiping method as before.


Be sure to paint over your dry leaf/twig matter.

Continue all around and up your cone until you have completed it. You can see I now have three nice white birch cone trees. This is a relatively quick process. It took about 10-15 minutes and these trees were done.

Adding Your Snowy Top
For your Snowy Top, you’ll need white glitter, a clear vase filler, and glue. Now, I tried both tacky glue and hot glue to see which one I liked better. For this part of the project, I liked the tacky glue a little more simply because I could smear it the way I wanted, and it caught more glitter. Either will work though, so you can pick your preference!


Cover your tip with either hot glue or tacky glue. Sprinkle with glitter and roll it in the vase filler. Repeat this until you get a snowy top you are happy with.


Here’s an example of the hot glue gun (it tends to look a little more icy).

Here’s an example of the tacky glue, which tends to look more snowy.

Like I said, I really preferred the snowy top more, and ended up taking all of my trees and re-glittering them using the tacky glue. I was very happy with the way they turned out!


I hope you find some birch trees in your near Holiday future!
Happy Crafting!

3 thoughts on “DIY Birch Cone Trees”